How to Setup Time Machine on Mac OS

Setup Time Machine on Mac OS X - FI

We all know how important backing up your computers are, especially if you don’t want to lose any of your data. Here at Doztech, we recommend two backup solutions, like backing up to SkyDrive or cloud drive. The first is locally, so you can access your files quickly. The other is offsite. Either a backup solution to the cloud or backing up your data to an external hard drive and sending it somewhere. None the less, the first solution we will talk about is a local backup solution on Mac OS X. Mac OS X has a built-in featured called Time Machine. This allows you to backup all of your data on Mac OS X without losing anything. Here is how to configure Time Machine on Mac OS X.

Perquisites

Before we show you how to setup Time Machine, we want to make sure you have a few items in the order.

  1. Mac OS X 10.5 or later
  2. A hard drive or partition that is connected to the Mac and formatted as Journaled HFS+ or an Airport Time Capsule.

Once you have these two ready, you can begin setting up Time Machine.

Setup Time Machine on Mac OS X

Plug in your hard drive into your Mac or make sure your Airport Time Capsule is configured and ready. Go to your Mac and click the Apple icon in the upper left-hand corner. A drop-down menu will appear. Click on System Preferences from the menu. 
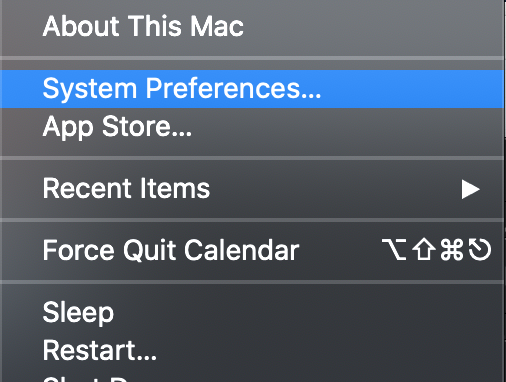
System Preferences

The System Preferences window will open. Locate the Time Machine menu item. It is on the 4th row. Then click on Time Machine. 
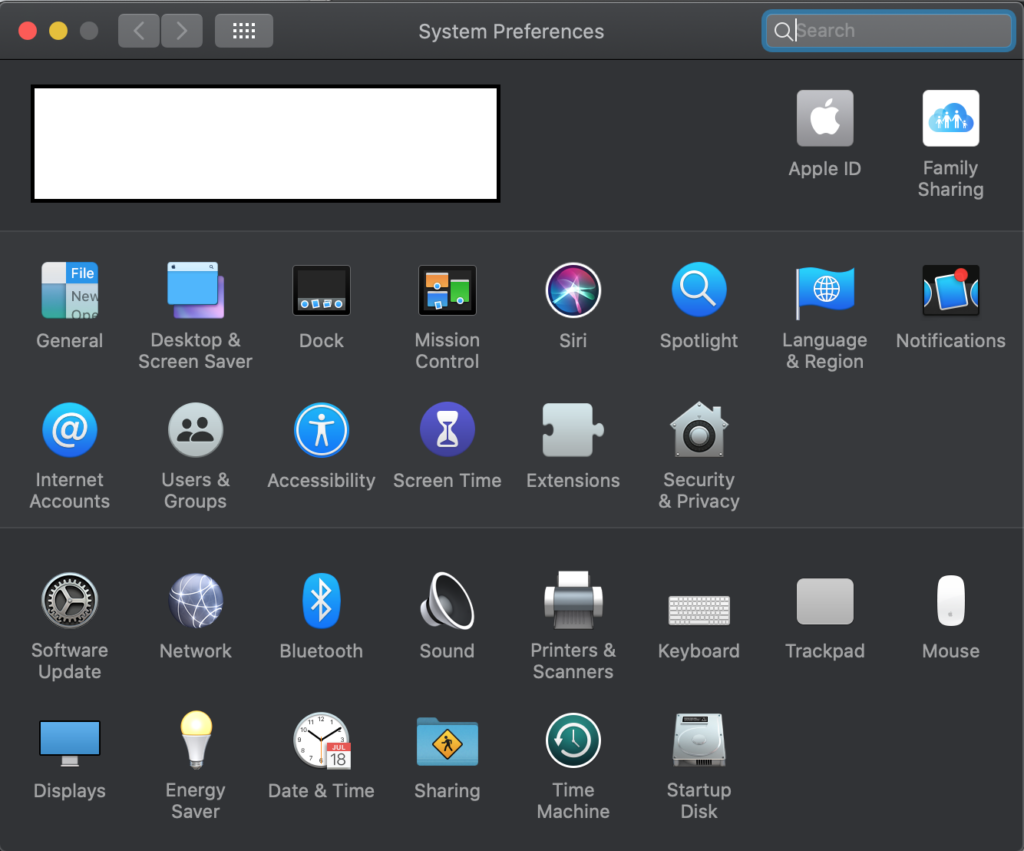
Time

The Time Machine setting window will open. Here is where you will configure Time Machine and select the backup disk. Click on Select Backup Disk in the right pane.
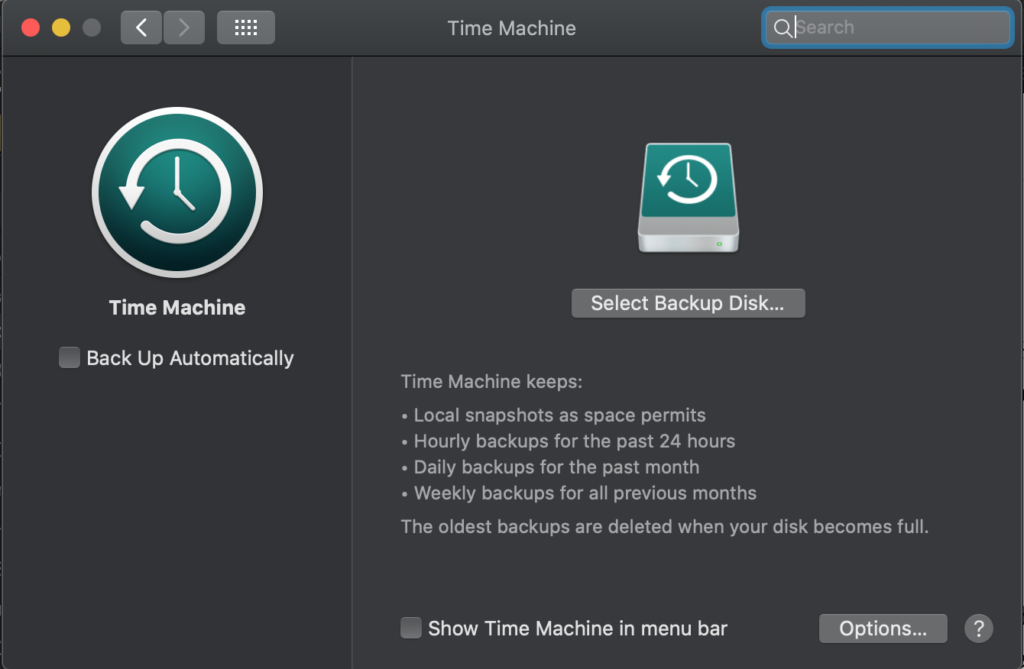
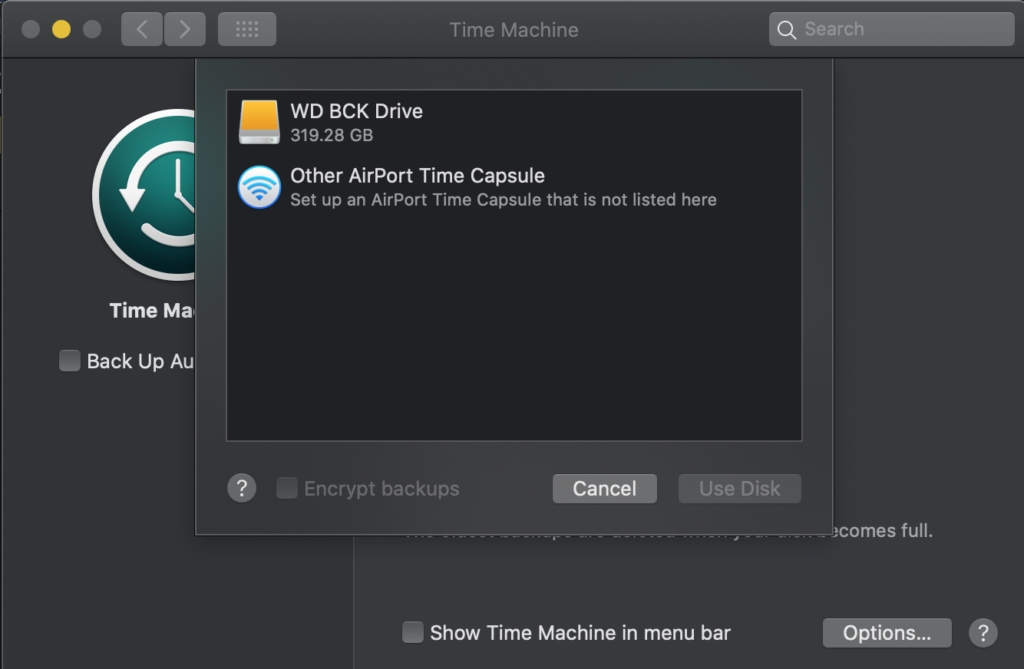
A drop down will appear. Here you can select the connected hard drive. If you don’t see your Airport Time Capsule or Backup Disk in the list, click the Other Time Capsule to locate it. When you are done selecting your backup disk you may want to check the box next to Encrypt backups. Encrypting your backups will prevent anyone from reading the data from the backup disk if it is stolen. It is always good to enable encryption so click the checkbox. When you are ready click the Use Disk button to continue.
You will be taken back to the main Time Machine window. Here you should see your backup disk selected and Time Machine turned on. Towards the bottom right of the Time Machine settings click on the Options button. 

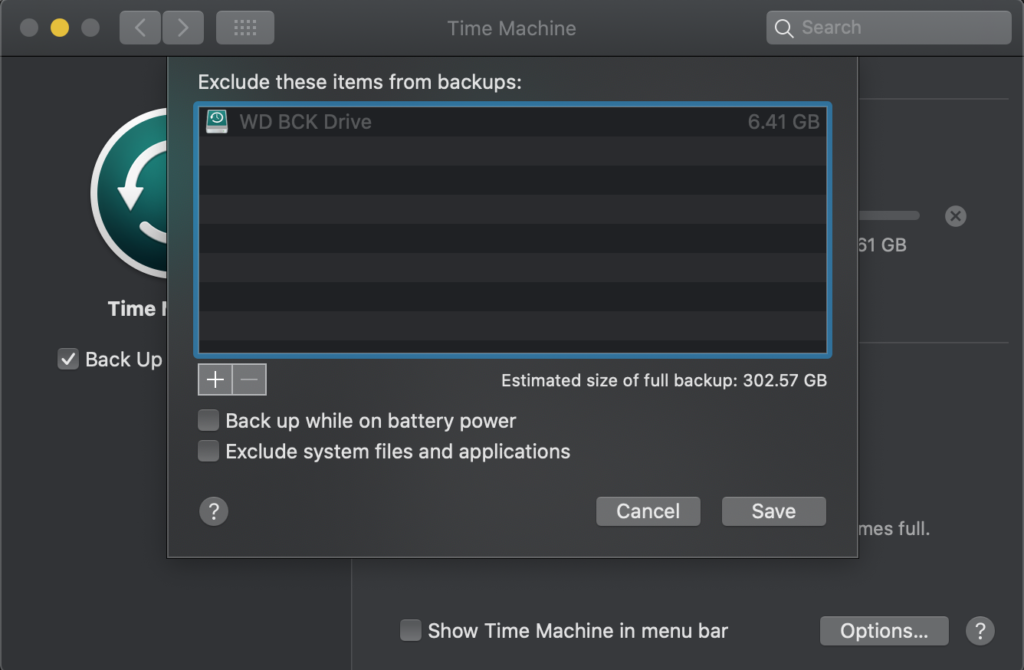
A pop-up window will appear. Here you can add or remove the backup disk from Time Machine. This comes in handy when you get a new drive or if you want to remove an old backup disk. This option menu also lets your turn on or off the notification when old backups are deleted. Whenever Time Machine backup disk is full, the old backups are deleted first. You can leave the checkbox checked if you want to see these notifications. When you are done configuring the options for Time Machine click Save.
Go ahead and close the open windows. In your menu bar you should see a new icon like the image below. Click on the icon. This is a shortcut to Time Machine. Here you can see the current status of your backup disk, do a full back up now, enter time machine, or look at Time Machines preferences.

We will talk a little more  about entering Time machine later, but for now you are ready to go. Time Machine will automatically backup MacOS X entirely.  What software do you guys use to backup Mac OS X?

Mac OS: Create a New User Account

Creating a new user account is a very simple task in Mac OS. If you remember, creating new user accounts in Windows 10 is really easy to do, but for now, let’s look at why you want to do this and how to remove user accounts as well.

Why Create a New User Account in Mac OS

One of the first reason I would create another user account in OS is to have a separate account that doesn’t have admin rights. I’ve mentioned before what could happen when you use your Windows 10 administrator account as a regular user account, and the same can be said for OS. Like I have said before, it is best to use a regular user account and enter in your administrative credentials when needed. Another reason to add user account is for your family, kids, spouse, and your cat if necessary. Other reasons could be for work, school, or the organization you are in requires multiple user accounts. So there are a lot of benefits from creating extra user accounts. Here is how to do this.

Create a New User in Mac OS

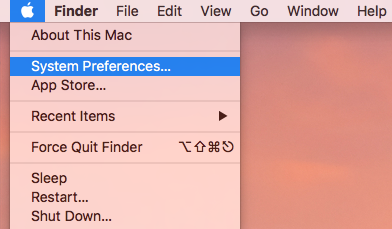
To create a new user, make sure you have your admin credentials handy,  click on Apple icon in the upper hand corner and click System Preferences.

The System Preferences window will open and click on Users & Groups.

Mac OSX Create a New User Account -2.png

On the Users & Groups menu, click the lock in the bottom left corner.

Mac OSX Create a New User Account -3.png

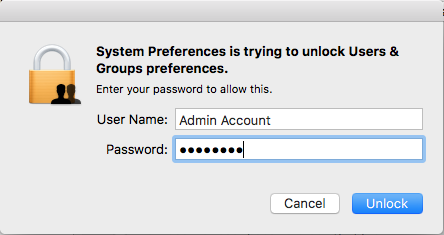
You will be prompted for your admin rights, enter them here and click Unlock.

You will be taken back to the User & Groups menu. Click the + sign to create a new user.

Mac OSX Create a New User Account -5.png

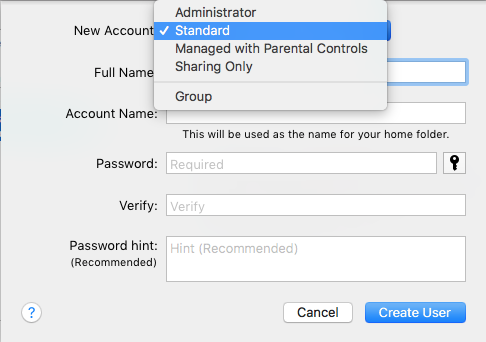
The new user account window will open. The first option is what type of Account. Here you can select an Administrator, Standard, Managed with Parental Controls, Sharing Only, or Group. Let’s discuss each below.

Administrator account, there needs to be at least one, has full control over your Mac. You can create multiple admin accounts if needed.

Managed with parental controls is the best account for kids or any one who needs a guiding hand when using the Mac. These users can access only the apps and content the admins specified. You can even restrict the contacts, website access, and place time limits on computer use. The administrative account will set these conditions.

Sharing only accounts lets you create a user account that doesn’t need direct access to the Mac. This account is good if you frequently share files since they can remotely connect to access those files. You can also utilize AirDrop for this, but we will talk about that in another article.

Group accounts give multiple users the same access privileges. This group will have the same access to shared files and folders. This is handy if you need to give multiple users access to files or folders on your Mac. All you have to do is create the group, add the users, and make sure that group has access to the files or folders.

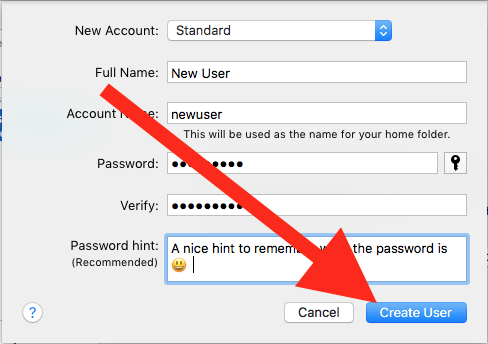
Now that is all said and done, select the user account that best fits your needs. Enter the required information and click Create User.

You’ll go back to the Users & Groups and will see your new user listed below.

Mac OSX Create a New User Account -8.png

How to Remove User Accounts in Mac OS

To remove a user account, head back the Users & Groups setting. Click the lock icon and enter in your admin rights. Then select the user you want to remove and click the – button.

Mac OSX Create a New User Account -9.png

The next window will give you some options when deleting the user. The first option, Save the home folder in a disk image, saves the home folder as a disk image and stores it in the Deleted Users folder, which is under the Users folder.

The next option is Don’t change the home folder. This keeps the home folder in the same location. For example, \User\NewUser would remain the same after removing the user account.

The last option is a complete wipe. You will delete the home folder and have no trace of that user. Well besides any applications they installed.

Select your option and click Delete User.

That user will be removed form the Users & Groups menu and that is it.

What is a Hypervisor?

The hypervisor is a platform that sits on top of hardware resources the enables virtualization. The virtualization becomes the platform that allows the creation of virtual machines and the sharing of hardware resources.

There are different Hypervisors. You get hardware Hypervisors that consist of operating and hardware and installed in a system, and the VMware ESXi server is an example of this. The second type is software hypervisor, and its hosted on the OS of the VMware system that runs the VMware, an example of this is VMware Workstation professional.

Cloud Computing

The term Cloud Computing is referring to shared resources via the internet that can be accessed by applications and users. The need for scalable on-demand network access is growing daily. More entities are joining the cloud environment to help them manage there Data and Application needs.

The are three main available option, IaaS, PaaS, and SaaS.

IaaS – Infrastructure as a service


The IaaS offers virtual resources that multiple people can access. These resources include Networking, Data Storage, and Servers. IaaS is not for everyone and catered for System Administrators as primary users. The Admins oversees the applications that run on the cloud provided infrastructure. The Admins are responsible for the security and service request, just like they would have been if it was a physical environment. 
The scalability that helps the increase or decrease of resources makes it a very flexible option.

Paas – Platform as a service 

Paas is a good option for developers who need all the comfort of a developing environment, but don’t want to give up office real estate. You get what you need, a Database, operating system, and a web server where developers can run and compile their programs. The only thing developers are responsible for is managing the Data. Infrastructure support gets handled by the Paas service provider and thus here is no need for infrastructure support from the developer. 

SAAS – Software as a service 

SaaS is an on-demand service that provides access to different application and workstations. You can access these via an internet browser or a local application client that allows you to run remote applications. An excellent example of this is when Mac user has something they need windows for, they can get an Amazon or Microsoft Asure virtual windows 10 PC. These SaaS options are inexpensive, and you only pay for what you use. The vendor manages all backend resources and infrastructure. Therefore the SAAS is a good option for small businesses or schools.

EHR vs EMR

The article is an attempt to elevate the discussion and confusion between EHR Electronic Health Records and EMR Electronic Medical Records.

Let’s start with EMR; EMR is no different from the paper medical record Doctors (MD) kept in the past. It contains all the patient’s information. This electronic record was an attempt to try and centralize clinical data and improve the quality management of these records. The EMR improves Billing and record-keeping. The improvements to medical coding are also significant since the electronic system update the code when new once is issued or change. 

The EHR, on the other hand, is all the same information ass an EMR but add some more functionality. The EHR allows you to share information with a broader group of providers that help maintain quality care for individuals.

Some concerns by providers are the challenges that implementation my bring. The most significant difference is entering information directly into the computer, tablet, or laptops. However, once this implementation is complete, you can now connect to Medical insurance, pharmacies, bloodwork labs, and even referrals to specialists without using paper.

There are inadequate implemented EHR systems, and they don’t provide all the functionalities needed in and medical office or institution. It ends up, resulting in a hybrid system between electronic and paper; thus, it does not provide all the efficiency you get from a well-implemented system.